Guide
Troubleshooting Guide
Struggling with Windows 11 compatibility issues? This troubleshooting guide helps you resolve common problems detected by the Windows 11 Compatibility Checker so you can upgrade with confidence.
Updated 2026-07-05
Understanding Windows 11 Compatibility Issues
Upgrading to Windows 11 can be daunting when your PC fails compatibility checks. The Windows 11 Compatibility Checker is a powerful tool that identifies the core hardware requirements needed for a smooth upgrade. These requirements include TPM 2.0, Secure Boot, sufficient RAM, adequate storage, and a supported processor.
When the checker flags issues, it can be unclear where to begin. Each error may relate to different system settings or hardware limitations. Knowing what each requirement means and how to address failures is the first step toward a successful installation.
This troubleshooting guide walks you through interpreting the checker's results, understanding the underlying causes, and applying practical solutions. Whether you are facing Secure Boot errors, missing TPM modules, or unsupported CPUs, you will find step-by-step instructions here to resolve the most common obstacles.
Detailed Fixes for Compatibility Failures
When the Windows 11 Compatibility Checker reports incompatibilities, you need targeted fixes. Start by reviewing the specific hardware or setting that failed. For example, a TPM 2.0 error may simply require enabling a setting in your BIOS, while storage or RAM issues might call for hardware upgrades.
Understanding how to access your BIOS or UEFI firmware is critical. Many compatibility issues are resolved by toggling options such as Secure Boot or TPM support. For older systems, a BIOS update can sometimes unlock new features or improve compatibility.
If your processor is unsupported, research whether a BIOS update adds CPU compatibility, or consider alternative installation methods if you accept the risks. RAM and storage upgrades are often the most straightforward fixes. This guide also covers common mistakes, such as misinterpreting Secure Boot requirements or overlooking firmware updates that can make your PC eligible for Windows 11.
Step-by-step
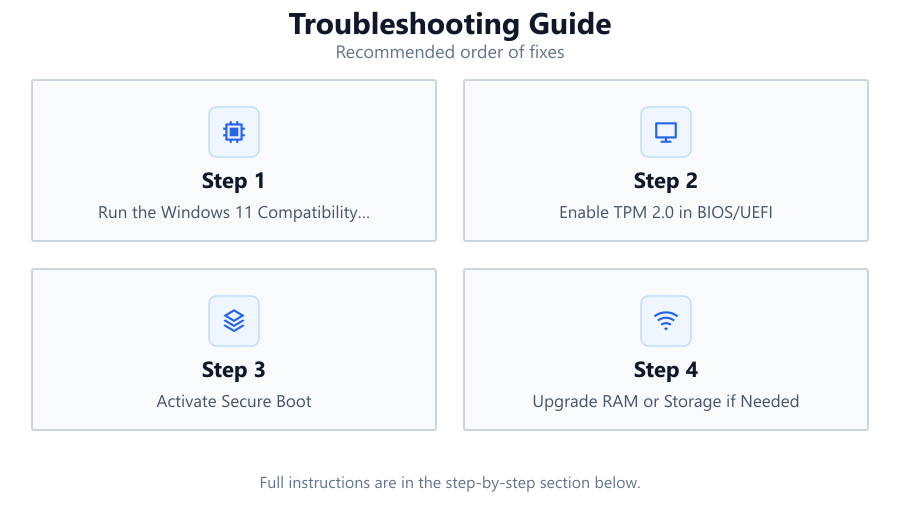
Run the Windows 11 Compatibility Checker
Download and launch the Windows 11 Compatibility Checker. Let it scan your PC for requirements like TPM 2.0, Secure Boot, RAM, storage, and CPU support. Review the detailed results to identify specific incompatibilities.
Enable TPM 2.0 in BIOS/UEFI
Restart your PC and enter the BIOS or UEFI firmware settings (typically by pressing Delete, F2, or another key during boot). Locate the TPM or Security tab and ensure TPM 2.0 is enabled. Save and exit, then rerun the compatibility check.
Activate Secure Boot
While in the BIOS/UEFI, find the Boot tab. Set Secure Boot to Enabled. If using Legacy Boot, switch to UEFI mode first. Save changes, reboot, and verify with the Windows 11 Compatibility Checker.
Upgrade RAM or Storage if Needed
If your system lacks sufficient memory or storage, install additional RAM modules or a larger storage drive. Most PCs require at least 4 GB RAM and 64 GB storage for Windows 11. After upgrading, rerun the compatibility tool.
Update BIOS/UEFI Firmware
Check your motherboard manufacturer's website for the latest BIOS or UEFI firmware. Follow their instructions carefully to update. Firmware updates can resolve incompatibilities with TPM, Secure Boot, or newer CPUs.
Assess CPU Compatibility
If the checker flags your processor as unsupported, check for BIOS updates that may add support. If unavailable, research alternative installation methods, but understand the risks and limitations before proceeding.
Comparison
| Requirement | Common Issue | Typical Solution |
|---|---|---|
| TPM 2.0 | Module disabled or missing | Enable in BIOS or install TPM module |
| Secure Boot | Disabled or Legacy boot mode | Enable Secure Boot and use UEFI mode |
| RAM | Less than 4 GB installed | Install additional RAM |
| Storage | Insufficient free space | Upgrade drive or free up space |
| CPU | Unsupported processor | Update BIOS or consider hardware upgrade |
Common mistakes
Mistake
Assuming TPM is not present because Windows does not detect it
Fix: Check your BIOS/UEFI settings to enable TPM. Many systems have it disabled by default.
Mistake
Not switching from Legacy to UEFI boot mode before enabling Secure Boot
Fix: Change boot mode to UEFI in BIOS/UEFI before activating Secure Boot for Windows 11 compatibility.
Mistake
Ignoring BIOS/UEFI firmware updates
Fix: Regularly check for and apply BIOS/UEFI updates, which may resolve compatibility issues with TPM, Secure Boot, or CPU support.
Mistake
Attempting to upgrade without meeting RAM or storage requirements
Fix: Ensure you have at least 4 GB RAM and 64 GB storage before proceeding with a Windows 11 upgrade.
Troubleshooting
Windows 11 Compatibility Checker reports TPM 2.0 missing
Likely cause: TPM is disabled in BIOS or motherboard lacks TPM module
What to do: Enter BIOS/UEFI and enable TPM. If unavailable, check for a TPM header on the motherboard and consider installing a compatible module.
Secure Boot not enabled error
Likely cause: System is booting in Legacy mode or Secure Boot is disabled
What to do: Switch the boot mode to UEFI and enable Secure Boot in BIOS/UEFI settings.
Insufficient RAM or storage space
Likely cause: Physical memory or disk space does not meet minimum requirements
What to do: Install additional RAM modules or upgrade your storage drive to meet or exceed the minimum specifications.
CPU not supported
Likely cause: Processor does not appear on Windows 11 supported list
What to do: Check for BIOS updates. If none are available, consider a hardware upgrade or research supported workarounds, understanding the risks involved.
Recommendations
- Always back up your data before making changes to BIOS/UEFI or hardware.
- Consult your motherboard and system documentation before attempting hardware upgrades.
- Use the Windows 11 Compatibility Checker after each change to verify progress.
- Keep your system firmware and drivers up to date for maximum compatibility.
- If unsure, seek professional assistance to prevent accidental damage to your PC.
Frequently asked questions
What is the Windows 11 Compatibility Checker?
The Windows 11 Compatibility Checker is a tool that scans your PC to determine if it meets the hardware and firmware requirements for Windows 11, such as TPM 2.0, Secure Boot, RAM, storage, and supported CPUs.
How do I enable TPM 2.0 if my PC says it is missing?
Restart your PC, enter the BIOS or UEFI settings, and look for a security or advanced tab. Enable TPM (sometimes labeled as PTT or fTPM), save changes, and reboot.
Can I install Windows 11 if my CPU is not on the supported list?
Windows 11 requires a supported processor for official installation. Some users use workarounds, but this is not recommended and may result in limited updates or unsupported configurations.
Do I need to replace my motherboard if my system lacks TPM?
Check if your motherboard has a TPM header for installing a compatible TPM module. If not, and TPM cannot be enabled, a motherboard upgrade may be required for full Windows 11 compatibility.
Is Secure Boot required for Windows 11?
Yes, Secure Boot must be enabled for Windows 11. You can activate it in the BIOS or UEFI settings after switching to UEFI boot mode.